Testing the new AKS Edge Essentials
Microsoft recently released the GA of "Azure Kubernetes Service Edge Essentials" after some years in preview. From the official documentation [emphasis mine]:
Azure Kubernetes Service Edge Essentials is an on-premises Kubernetes implementation of Azure Kubernetes Service (AKS) that automates running containerized applications at scale. AKS Edge Essentials includes a Microsoft-supported Kubernetes platform that includes a lightweight Kubernetes distribution with a small footprint and simple installation experience, making it easy for you to deploy Kubernetes on PC-class or "light" edge hardware. AKS Edge Essentials makes it easier to get started with your containerized application, bringing cloud-native best practices to your edge application.
Sounds very attractive for two specific use cases that if often see in my daily work:
- Clients that has co-lo / on-prem infrastructure and are not ready/willing to move "to the cloud" but wants to be able to run docker containers (Linux and Windows). Today we use mostly Docker Swarm as it is more simple to install, manage and maintain on existing hardware than Kubernetes. Other solution exists such as "AKS on Windows Server" and "AKS on Azure Stack HCI" (see Azure Kubernetes Service hybrid deployment options) but these options requires specialized hardware and is very expensive.
- Local development and testing workloads that runs on Kubernetes in upstream environments. Today it is common to do this with Docker Compose, commit, push and wait for the CI/CD pipeline to deploy onto Kubernetes which can be a long feedback loop.
Let's see how AKS EE can help with this!
The details
Minimum hardware requirements per machine *:
- OS: Windows 10/11 IoT Enterprise/Enterprise/Pro or Windows Server 2019, 2022
- Memory: 4 GB with at least 2.5 GB free
- CPU: 2 vCPUs, clock speed at least 1.8 GHz
- Disk space: At least 14 GB free
* This is the bare minimum for Linux node only machines, in case of Windows containers you will need more CPU/Memory/disk ;-)
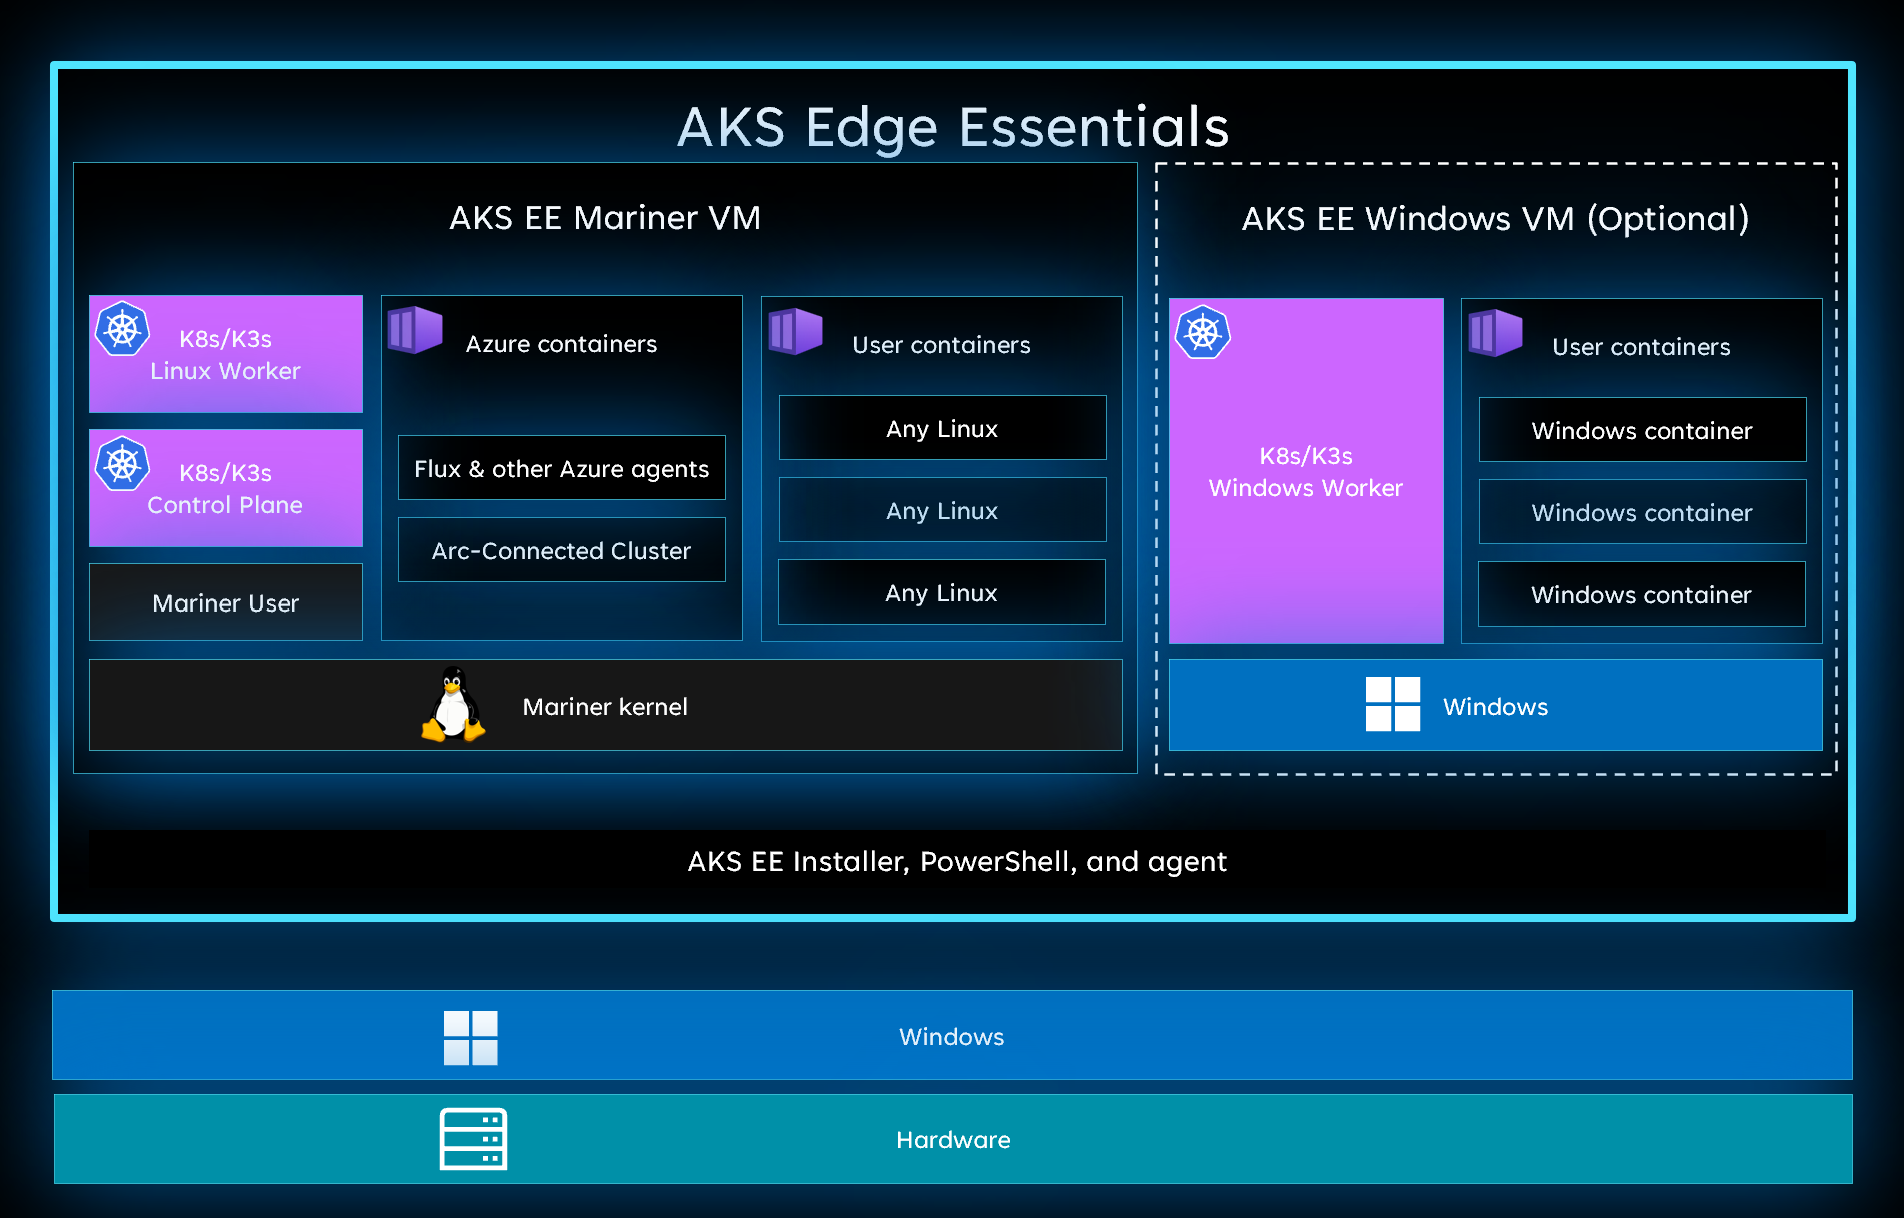
When you create an AKS EE deployment, it creates a VM for each of the nodes on the machine. A single machine can have 1 Linux node (pure worker or control pane) and optionally 1 Windows node. You can have a maximum of 15 machines in total.
This also means that AKS EE runs side-by-side with Docker Desktop both in Linux and Windows mode!
You can deploy on your workstation, dedicated server(s) or for testing purpose; virtual machines(s).
TIP: Remember to enable nested virtualization and MAC address spoofing if you are testing with Hyper-V based virtual machines!
There are two deployment options:
- Single: Runs Kubernetes nodes on a single machine to create a single machine cluster.
- Full: Lets you create a multi-node Kubernetes cluster and also enables you to scale out to multiple machines as needed (but maximum of 15 machines currently).
If you choose "single" then there is no option to add more machines later but if you choose "full" then you can (but don't have to). Choosing full you have to use an external VM switch and with single you can only use a private VM switch.
BTW licensing is free for development and testing and pricing for production is around $2.50/device/month when connected to an Azure subscription.
Getting started
Let's try to install AKS-EE, deploy a mixed node cluster and then deploy a minimal Sitecore XM workload!
Install AKS EE and deploy mixed Linux/Windows cluster on a single machine
Get and prepare downloads:
Start-BitsTransfer "https://aka.ms/aks-edge/k8s-msi" -Destination "~\Downloads\k8s.msi"
Start-BitsTransfer "https://aka.ms/aks-edge/windows-node-zip" -Destination "~\Downloads\windows-node.zip"
Expand-Archive -Path "~\Downloads\windows-node.zip" -DestinationPath "~\Downloads"
Then start installation with:
msiexec.exe /i (Get-Item "~\Downloads\k8s.msi").FullName /passive ADDLOCAL=CoreFeature,WindowsNodeFeature
...or if you want the VM disks on another drive (see docs for all arguments):
msiexec.exe /i (Get-Item "~\Downloads\k8s.msi").FullName /passive ADDLOCAL=CoreFeature,WindowsNodeFeature VHDXDIR=D:\Data\AksEdge
Now verify you the installation was successful:
Import-Module AksEdge
Get-Command -Module AKSEdge | Format-Table Name, Version
IMPORTANT! Before starting the cluster deployment, please notice that the following command will overwrite your current kubeconfig at $HOME/.kube/config, so make sure to backup if needed! See https://github.com/Azure/AKS-Edge/issues/125 for details.
Now you can deploy a new cluster (takes about ~6 minutes):
New-AksEdgeDeployment -JsonConfigString (curl.exe "https://raw.githubusercontent.com/pbering/aksee-test/main/single-mixed.json" | Out-String)
You now have a running Kuberneters cluster with a Linux node and Windows node on a single machine, you can verify this with kubectl get node.
Post deployment steps
- Taint the Windows node:
kubectl taint node "$(Get-AksEdgeNodeName -NodeType Windows)" os=windows:NoSchedule - Install nginx ingress:
- Install:
kubectl apply -f https://raw.githubusercontent.com/kubernetes/ingress-nginx/controller-v1.8.0/deploy/static/provider/baremetal/deploy.yaml - Configure nginx with:
kubectl edit svc ingress-nginx-controller -n ingress-nginx, changespec.typefromNodePorttoLoadBalancer. - Verify that nginx got an external IP address:
kubectl get services -n ingress-nginx ingress-nginx-controller
- Install:
- Install local path provisioner for Linux container persistence:
- Run:
kubectl apply -f https://raw.githubusercontent.com/Azure/AKS-Edge/main/samples/storage/local-path-provisioner/local-path-storage.yaml - For details, see docs...
- Run:
Deploy Sitecore XM
Create a new project directory:
mkdir .\sitecore-xm;cd .\sitecore-xmDownload workload:
curl.exe https://raw.githubusercontent.com/pbering/aksee-test/main/test/xm/kustomization.yaml -o .\kustomization.yamlGenerate certificates (download mkcert https://github.com/FiloSottile/mkcert/releases):
mkcert -install
mkcert -cert-file ".\cm-tls.crt" -key-file ".\cm-tls.key" "cm.aksee.local"
mkcert -cert-file ".\id-tls.crt" -key-file ".\id-tls.key" "id.aksee.local"
Prepare HOST file, run
kubectl get services -n ingress-nginx ingress-nginx-controllerand use the external IP to add two new entries:192.168.1.4 id.aksee.local192.168.1.4 cm.aksee.local
Prepare the Sitecore license, assuming you have the SitecoreDockerTools PowerShell module installed you can then run:
Import-Module SitecoreDockerTools
ConvertTo-CompressedBase64String -Path "C:\License\license.xml" | Out-File -Encoding ascii -NoNewline -FilePath .\sitecore-license.txt
Then deploy the workload:
kubectl create namespace xm
kubectl apply -n xm -k .
You can observe the progress with
kubectl -n xm get podsor https://k9scli.io/ or just wait withkubectl wait --for=condition=complete jobs/mssql-init jobs/solr-init -n xm --timeout 15mDone! Now you can visit https://cm.aksee.local.
Conclusion
There you have it, finally a easy and production friendly way to install Kubernetes on-prem / locally with Windows container support. While single machine deployments with Linux nodes are in GA, multi machine and Windows nodes are still in preview but looks like they will hit GA soon.
Posted 2023-06-09, tagged: kubernetes, aks, docker, sitecore
